Add Row
Add Element
cropper
update
Ultimate Home DIY
update
Add Element
  • Home
  • Categories
    • Home Hacks
    • Tool Tips
    • Green Living
    • Renovation
    • Fix It
    • Decor Dreams
    • Skill School
July 23.2025
3 Minutes Read

Remove Carpet Mold Effectively: 7 Steps to a Healthy Home

Carpet lifted to inspect for mold, revealing subfloor padding.

Understanding Mold and Its Implications for Your Home

Mold is not just an unsightly blemish on your carpet; it poses serious health risks, particularly to children, the elderly, and those with pre-existing conditions. As a homeowner, it's essential to understand how mold thrives and spreads. Mold spores, which are microscopic and easily airborne, can grow in as little as 24 to 48 hours after water exposure. This rapid growth underlines the importance of timely intervention. The connection between hydro conditions and mold proliferation emphasizes the necessity of a proactive approach in your home maintenance routines.

Gathering Your Tools: The First Step to Success

Before you start the mold removal process, collect all the necessary tools. At a minimum, you'll need:

  • A protective mask and gloves to ensure your safety while handling potentially harmful mold.
  • A stiff-bristled brush for scrubbing the affected area.
  • A vacuum cleaner with a HEPA filter to trap mold spores.
  • Baking soda, a natural deodorizer and mild abrasive.
  • White vinegar, a powerful disinfectant.

By having these items on hand, you'll be well-prepared to tackle even the most stubborn mold.

The Seven Steps: Safely Removing Mold from Your Carpet

Now that you're equipped, let’s dive into the seven straightforward steps to rid your carpet of mold:

  1. Ventilate the Area: Open curtains and windows to enhance airflow and help the carpet dry quicker.
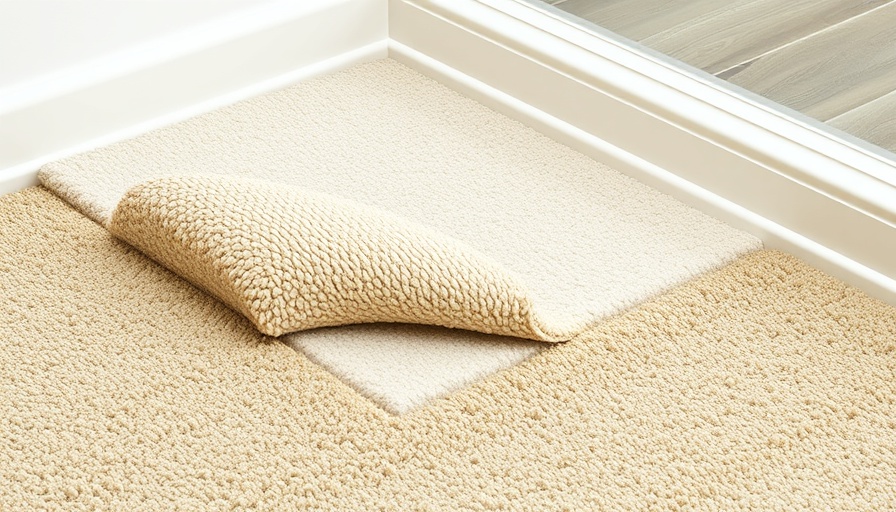
  2. Inspect the Carpet: Identify all affected areas by checking not just the surface, but also the underside of the carpet.
  3. Scrub the Mold: Using your brush, scrub away the visible mold. Follow this with a thorough vacuum to remove debris.
  4. Apply Baking Soda: Generously sprinkle baking soda on the affected area. Let it sit overnight to absorb moisture and odors, then vacuum it up.
  5. Vinegar Application: Fill a spray bottle with white vinegar and apply it directly onto the mold. After a few minutes, scrub again with the brush.
  6. Blotting: Use a damp towel to blot the area, removing residual mold and vinegar.
  7. Dry the Carpet: Allow the carpet to dry completely to prevent future mold growth.

These steps not only clear mold but can contribute to a healthier home environment.

Identifying Mold: Visible Signs to Watch For

Understanding how to identify mold can save you time, hassle, and potential health risks. Look for:

  • Visible Growth: Mold can often be spotted in dark patches on carpet fibers.
  • Color Variation: Mildew presents as yellow, gray, or white, while mold can be green, black, or even blue.
  • Water Damage: Stains or watermarks often indicate hidden mold growth beneath the surface.
  • Foul Odors: A musty smell lingering in the air can indicate mold, even before it’s visible.

Prompt identification helps mitigate the spread of mold, ensuring your home remains a sanctuary for your family.

The Urgency of Action: Why Removing Mold Matters

Ignoring mold in your carpet can lead to significant health risks, including respiratory issues and allergies. Mold affects air quality, potentially causing lung diseases and other serious health problems. Moreover, mold can spread rapidly, resulting in more extensive damage to your home and requiring expensive professional intervention. Therefore, if you notice mold growth, particularly smaller areas less than 10 square feet, address it immediately using the methods above. For larger infestations, don’t hesitate to seek professional help.

Preventing Future Mold Growth: Proactive Measures

Once you've effectively removed mold from your carpet, it’s vital to implement strategies to prevent its return:

  • Control Humidity: Use dehumidifiers in areas prone to moisture, such as basements.
  • Regular Cleaning: Maintain a routine deep cleaning schedule, focusing on high-risk areas in your home with carpets.
  • Fix Leaks Promptly: Address any plumbing issues immediately to eliminate sources of moisture.

By adopting these preventive measures, you maximize the chances of keeping your home mold-free.

Mold removal doesn’t have to be a daunting task. With these practical steps and a little effort, you can regain control of your space and ensure a healthier environment for your family. Remember, the key is to act fast, be thorough in your cleaning, and prioritize preventing mold from returning. Ready to reclaim your carpet and safeguard your home? Start your mold removal journey today!

Skill School

0 Views

0 Comments

Write A Comment

*
*
Related Posts All Posts
07.22.2025

Decoding Thermopile Voltage Low: Essential Insights for Homeowners

Update The Importance of Understanding Thermopile Voltage Low As homeowners, we usually expect our water heaters to perform efficiently, providing us with warm water during the chilly seasons. However, nothing is more bewildering than turning on your heater only to find that the pilot light has gone out, leaving you stuck without hot water. A common culprit behind this scenario is low thermopile voltage, which poses an essential question: what does this mean for your home, and how can you address it? What Is a Thermopile? A thermopile is a critical component of your water heater that integrates multiple thermocouples to monitor and maintain the heater's temperature. When functioning correctly, it generates voltage based on the heat it senses. If this voltage drops too low, your water heater may shut off, leaving your home without a reliable hot water source. Recognizing Low Thermopile Voltage The feelings of confusion and annoyance can be overwhelming when your heater isn't working as it should. To better understand if low thermopile voltage is the issue, consider observing your heater's pilot light. If the light is not on, the heater is unable to function properly, resulting in a frustrating freeze during your usual warm baths. How to Test Your Thermopile Like a Pro Testing your thermopile can seem daunting, but it’s relatively straightforward. Armed with a multimeter—an easy-to-use tool that measures voltage—you can diagnose the issue in less than five minutes. To do this: Set your multimeter to record millivolts. Disconnect the thermopile wires from the gas control unit by carefully loosening them. Attach the black positive lead with the white wire and the red lead to the thermopile's red wire. Follow the specific instructions from the manual to reignite the pilot light; you should see a voltage increase, indicating that the thermopile is working as intended. Why Regular Maintenance Matters Regular maintenance is vital to ensuring your water heater, and its components function smoothly. Ignoring low thermopile voltage could lead to larger issues, culminating in the need for costly repairs or even replacement. Homeowners can save money and time by understanding the basics of how a water heater operates, including knowing why the thermopile is vital to its efficiency. Risks of Ignoring Thermopile Issues Neglecting to address low thermopile voltage may have broader consequences. This can lead to gas leaks, appliance breakdowns, and increased utility bills. Additionally, prolonged issues could severely diminish the lifespan of your water heater, causing a much larger financial burden in the long run. Future Implications: The Importance of Thermopile Awareness Success in managing your water heater largely depends on your awareness of its components. Investing time in understanding thermopile voltage, and making periodic checks not just ensures efficiency but can also elevate your overall home maintenance strategy. In an era where sustainability and efficient home economics are critical, this basic knowledge can empower homeowners. Final Thoughts: Take Action Today! Being proactive about your home maintenance can save you from significant inconveniences down the line. Don't wait for the lack of hot water to seek assistance; familiarize yourself with the thermopile's role. Empower yourself to make informed decisions on your water heater's care, ensuring warmth and comfort for your family during the cold months.

07.20.2025

Discover the Best Tile for Shower Walls in 2025: A Complete Guide

Update Choosing the Right Tile for Your Shower Walls Are you ready to transform your bathroom oasis but feel overwhelmed by the numerous tile options available? Choosing the right tile for shower walls is more than just an aesthetic decision; it’s an important investment in your home’s future. Factors like durability, maintenance, and overall cost should all be considered. This guide delves into the best tiles for shower walls in 2025, helping you make an informed choice. The Essentials of Shower Tile When selecting tile for your shower, it’s crucial to think beyond appearance. The best tile will not only look nice but also stand up to moisture, mold, and the heavy use typical in a bathroom setting. Popular materials that have proven to be suitable for shower walls include ceramic, porcelain, and natural stone — each with unique properties. 1. Ceramic vs. Porcelain: The Debate Ceramic and porcelain tiles often dominate bathroom design discussions; they may seem similar, but understanding their differences is essential. Ceramic tiles are typically less dense, making them more vulnerable to water damage over time if not maintained properly. In contrast, porcelain tiles are denser, fired at higher temperatures, and thus more resistant to water penetration. While they may cost more upfront ($3 to $10 per square foot for porcelain compared to $0.50 to $7 for ceramic), their durability often justifies the price. 2. The Appeal of Glazed Tiles Glazed ceramic tiles offer a stunning visual appeal alongside practical benefits. The glass-like surface not only provides an elegant finish but also resists stains and mold, making maintenance a breeze. With options available in a variety of colors and designs, these tiles can elevate the aesthetic of any shower while ensuring a long-lasting solution for homeowners. 3. Unleashing the Power of Natural Stone For those seeking a luxurious touch, natural stone tiles, such as marble or slate, can bring unparalleled beauty and uniqueness to your shower. However, keep in mind that natural stone requires more maintenance due to its porous nature. Regular sealing and careful cleaning is necessary to maintain its stunning appearance. 4. Trends for 2025: Innovations in Tile As we look ahead to 2025, trends indicate a significant shift towards eco-friendly and sustainable materials. Many homeowners are now gravitating towards recycled tiles for their environmentally friendly attributes, as well as glass tiles that contribute to water conservation. The focus is not only on aesthetics but also on sustainability, creating spaces that reflect a homeowner's lifestyle choices. 5. Maximizing Durability with Your Tile Choice Whichever tile you choose, ensuring its longevity involves proper installation and care. Be sure to consult with professionals who can guarantee that your tiles are not just aesthetically pleasing but also secure against the moisture that showers inherently bring. Ensuring your tiles are correctly installed and maintained will protect your investment and keep your bathroom looking fresh for years to come. Taking the Next Step in Your Home Improvement Journey Before finalizing your tile selection, consider samples and visualize them in your space. Engaging with local home improvement stores for tile samples allows you to see how each tile fits with your overall bathroom design. Ultimately, the right choice will resonate with both your style and practical needs as a homeowner. Updating your shower walls doesn’t have to be daunting; with the right knowledge and research, you can find the perfect tile that enhances your bathroom's aesthetics and functionality. Take control of your home renovation process, and enjoy the results of your thoughtful choices!

07.19.2025

Discover Effective Techniques to Easily Remove Hard Water Stains in Your Toilet

Update Understanding the Dilemma of Hard Water StainsHard water stains can be a homeowner's worst nightmare, particularly in a household where cleanliness and comfort are paramount. These pesky stains, formed from calcium and magnesium deposits, don’t just limit themselves to the toilet. They can sneak their way into faucets, showers, and tiles, leading to a build-up that can seem impossible to tackle. But fear not! With the right methods and materials, you can restore your bathroom’s beauty without the need for expensive chemical cleaners.Eco-Friendly Solutions to the RescueIf you’re environmentally conscious and prefer natural cleaning solutions, you've hit the jackpot! Many of the best substances for eliminating hard water stains are common household items. Here are some of the best eco-friendly options:White Vinegar: This kitchen staple is acetic acid, making it effective against mineral deposits. Pouring it into the toilet and letting it sit will soften those tough stains.Baking Soda: Known for its deodorizing properties, baking soda can be combined with vinegar to create a bubbly reaction that lifts grime, making it perfect for treating stains.Borax: A magical powder that works wonders when mixed with vinegar or used on its own to scrub away hard water deposits.Step-by-Step Cleaning TechniquesNow, let’s dive into effective methods for cleaning those hard water stains in the toilet:1. The Power of White VinegarStart by removing the majority of the water using a plunger, then dry the bowl with paper towels. Pour in about 2 cups of white vinegar and let it sit for a few hours. Afterward, use a toilet brush to scrub the stains, applying more vinegar if necessary. For exceptionally tough marks, a pumice stone can be a game changer, just ensure the stone is wet to prevent scratching.2. Baking Soda and Vinegar: A Dynamic DuoCombine 1 cup of baking soda with 2 cups of vinegar for a powerful cleaner. Pour the vinegar into the toilet first, followed by the baking soda. You might notice some fizzing! Allow it to sit for at least 10 minutes before scrubbing with a toilet brush.3. Borax Extra BoostFor an enhanced clean, sprinkle ½ cup of Borax into the toilet bowl and let it sit for about 20 minutes. Then scrub away the stains with a brush, followed by a flush to rinse everything away.Additional Insights on Hard Water IssuesMany homeowners may not realize that hard water issues extend beyond just unsightly stains; they can also lead to plumbing problems. Mineral build-up can cause clogs and diminished flow rates in your water system. These cleaning methods not only improve the appearance of your toilet but also contribute to the longevity of your plumbing fixtures.Taking Preventative Measures Against Hard WaterTo prevent the build-up of hard water stains in the future, consider these tips:Water Softener Installation: If hard water is a consistent problem, it may be worth investing in a water softener system to reduce mineral content.Routine Maintenance: Develop a regular cleaning schedule using the eco-friendly methods mentioned above to keep hard water deposits at bay.Engaging Perspectives from the CommunityIt’s fascinating to see how different homeowners tackle the same issue. One reader shared how using Coca-Cola not only cleaned her toilet but also left a fresh scent—an affordable and surprising twist! Others have recommended lavender oil for added fragrance. Exploring these perspectives can provide new and effective ways to approach your cleaning regimen.Your Call to Action: Take Control of Your Bathroom!Don’t let hard water stains rule your bathroom! Try out these cleaning methods today, and you’ll be amazed at the transformation. Remember, keeping your home clean and environmentally friendly is achievable with the right strategies and tools. Share your own experiences and any tips that work best for you in the comments below!

Terms of Service

Privacy Policy

Core Modal Title

Sorry, no results found

You Might Find These Articles Interesting

T
Please Check Your Email
We Will Be Following Up Shortly
*
*
*