Add Row
Add Element
cropper
update
Ultimate Home DIY
update
Add Element
  • Home
  • Categories
    • Home Hacks
    • Tool Tips
    • Green Living
    • Renovation
    • Fix It
    • Decor Dreams
    • Skill School
March 16.2025
4 Minutes Read

Create Your Own Oasis: Affordable DIY Hot Tub Plans for Homeowners

DIY hot tub ideas: Wooden hot tub in serene garden setting.

Transform Your Backyard with Budget-Friendly DIY Hot Tubs

After a hectic day, nothing beats the soothing experience of unwinding in your very own hot tub. Imagine soaking under the stars, enveloped by warm water while enjoying the beauty of your garden. Building a DIY hot tub can turn this dream into reality without breaking the bank. In this article, we explore 18 ingenious DIY hot tub plans that are both creative and economical.

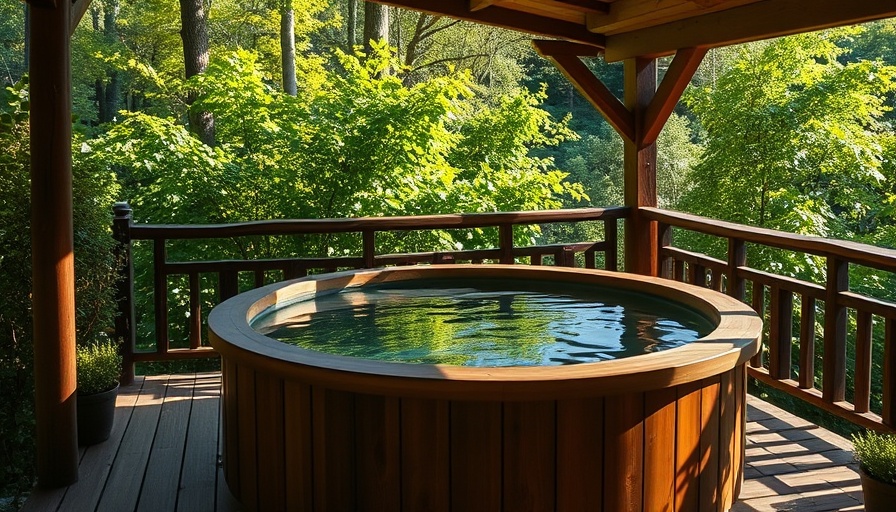
1. The Charm of a Cedar Hot Tub

A cedar hot tub is a beautiful, natural choice that can add a rustic charm to your outdoor space. Not only is cedarwood a great insulator, but its natural oils also help maintain the water temperature—creating a cozy soak experience. Begin by sourcing high-quality, clear cedar boards. You'll need a cross-cut saw for the staves, measuring 3 feet long and 3.5 inches wide, which will form the walls of your tub. The joinery is crucial; using a router will allow you to create the perfect rounded edges for each stave, ensuring a watertight seal once they’re put together. Finish with benches and a wood stove for heating, and you’ll have a stunning centerpiece for relaxation!

2. Stunning Japanese Hot Tub Design

If you’re looking for something distinctly charming and functional, consider building a Japanese hot tub. These tubs are typically round and feature unique interior designs, such as hexagonal benches that provide comfortable seating. Constructing this hot tub will include thoughtful designs for water heating, often utilizing a rear heating system that enhances aesthetics. Its captivating look will surely be a talking point for guests!

3. The Innovative Chofu Hot Tub

The Chofu hot tub presents a creative twist with a small wood stove that heats the water using a thermo-siphon method. This unique design means you won’t need any electrical pumps, promoting a simpler, more natural feel. It's advisable to insulate the tub when not in use and to avoid chemical treatments for longevity. This design can be completed in under an hour—ideal for spontaneous hot tub enthusiasts!

Cement Your Relaxation with a Concrete Hot Tub

Looking for durability? A concrete hot tub might be the answer! While a bit more labor-intensive, a concrete hot tub offers a permanent solution to your backyard oasis. Start by digging out a space to accommodate your tub's shape and size, then fill it with concrete. Once set, you can build the outer walls with blocks and add piping for jets, ensuring a spa-like experience right at home. Keep in mind, the concrete will make your hot tub a semi-permanent feature, so choose its location wisely.

Going Natural: The Earthy Hot Tub

For nature enthusiasts, a natural hot tub blends beautifully into the surroundings. Burying your tub into the ground creates a stunning environment enhancing your landscaping. Pond-style designs can be incorporated with natural stones lining the interior, creating a smooth transition into your garden sanctuary. With the right construction, this hot tub can offer unique aesthetics that’s both relaxing and harmonious with nature.

Budget-Friendly Considerations

When it comes to DIY hot tubs, budget is a key aspect. According to various sources, including our reference materials, constructing a hot tub can typically be done for well under $3,000, a fraction of what you would pay for a professionally installed unit, which can sometimes reach up to $15,000. Why pay more when you can enjoy the same relaxation benefits and customize your build to perfectly match your style?

Unique Benefits of DIY Hot Tubs

Opting for a DIY hot tub offers several benefits beyond just cost savings. Creating a hot tub that suits your personal aesthetic allows you to express your creativity. Additionally, constructing it yourself means that you can tailor the heating and filtering systems to your preferences, ensuring an efficient and enjoyable soaking experience.

Taking the Plunge: Actionable Tips for Your DIY Project

To ensure your DIY hot tub project is a success, begin with thorough planning. Take the time to sketch and plan out your design, factoring in the materials needed, the dimensions, and how best to integrate the structure within your backyard. Always prioritize safety by ensuring proper installation of heating systems, and consider consulting local building codes about the required permits. Sharing your journey on social media can inspire others and form a supportive community!

What DIY Hot Tub is Right for You?

With numerous DIY hot tub designs available, it's key to find one that suits your specific needs and available resources. Analyze your space, your budget, and how frequently you plan on using your tub to make the best choice.

Whether you choose a rustic cedar tub or a modern concrete design, the warmth and comfort of a DIY hot tub will surely enhance your wellness routine and backyard ambiance. So grab your tools and start building your perfect retreat!

Join the DIY Fun!

Don’t just fantasize about the luxurious soak in your own hot tub - take action! Start planning your DIY hot tub today and transform your backyard into a personal oasis that offers relaxation, beauty, and style! For more engaging DIY tips and home improvement ideas, follow us!

Skill School

0 Views

0 Comments

Write A Comment

*
*
Related Posts All Posts
07.20.2025

Discover the Best Tile for Shower Walls in 2025: A Complete Guide

Update Choosing the Right Tile for Your Shower Walls Are you ready to transform your bathroom oasis but feel overwhelmed by the numerous tile options available? Choosing the right tile for shower walls is more than just an aesthetic decision; it’s an important investment in your home’s future. Factors like durability, maintenance, and overall cost should all be considered. This guide delves into the best tiles for shower walls in 2025, helping you make an informed choice. The Essentials of Shower Tile When selecting tile for your shower, it’s crucial to think beyond appearance. The best tile will not only look nice but also stand up to moisture, mold, and the heavy use typical in a bathroom setting. Popular materials that have proven to be suitable for shower walls include ceramic, porcelain, and natural stone — each with unique properties. 1. Ceramic vs. Porcelain: The Debate Ceramic and porcelain tiles often dominate bathroom design discussions; they may seem similar, but understanding their differences is essential. Ceramic tiles are typically less dense, making them more vulnerable to water damage over time if not maintained properly. In contrast, porcelain tiles are denser, fired at higher temperatures, and thus more resistant to water penetration. While they may cost more upfront ($3 to $10 per square foot for porcelain compared to $0.50 to $7 for ceramic), their durability often justifies the price. 2. The Appeal of Glazed Tiles Glazed ceramic tiles offer a stunning visual appeal alongside practical benefits. The glass-like surface not only provides an elegant finish but also resists stains and mold, making maintenance a breeze. With options available in a variety of colors and designs, these tiles can elevate the aesthetic of any shower while ensuring a long-lasting solution for homeowners. 3. Unleashing the Power of Natural Stone For those seeking a luxurious touch, natural stone tiles, such as marble or slate, can bring unparalleled beauty and uniqueness to your shower. However, keep in mind that natural stone requires more maintenance due to its porous nature. Regular sealing and careful cleaning is necessary to maintain its stunning appearance. 4. Trends for 2025: Innovations in Tile As we look ahead to 2025, trends indicate a significant shift towards eco-friendly and sustainable materials. Many homeowners are now gravitating towards recycled tiles for their environmentally friendly attributes, as well as glass tiles that contribute to water conservation. The focus is not only on aesthetics but also on sustainability, creating spaces that reflect a homeowner's lifestyle choices. 5. Maximizing Durability with Your Tile Choice Whichever tile you choose, ensuring its longevity involves proper installation and care. Be sure to consult with professionals who can guarantee that your tiles are not just aesthetically pleasing but also secure against the moisture that showers inherently bring. Ensuring your tiles are correctly installed and maintained will protect your investment and keep your bathroom looking fresh for years to come. Taking the Next Step in Your Home Improvement Journey Before finalizing your tile selection, consider samples and visualize them in your space. Engaging with local home improvement stores for tile samples allows you to see how each tile fits with your overall bathroom design. Ultimately, the right choice will resonate with both your style and practical needs as a homeowner. Updating your shower walls doesn’t have to be daunting; with the right knowledge and research, you can find the perfect tile that enhances your bathroom's aesthetics and functionality. Take control of your home renovation process, and enjoy the results of your thoughtful choices!

07.19.2025

Discover Effective Techniques to Easily Remove Hard Water Stains in Your Toilet

Update Understanding the Dilemma of Hard Water StainsHard water stains can be a homeowner's worst nightmare, particularly in a household where cleanliness and comfort are paramount. These pesky stains, formed from calcium and magnesium deposits, don’t just limit themselves to the toilet. They can sneak their way into faucets, showers, and tiles, leading to a build-up that can seem impossible to tackle. But fear not! With the right methods and materials, you can restore your bathroom’s beauty without the need for expensive chemical cleaners.Eco-Friendly Solutions to the RescueIf you’re environmentally conscious and prefer natural cleaning solutions, you've hit the jackpot! Many of the best substances for eliminating hard water stains are common household items. Here are some of the best eco-friendly options:White Vinegar: This kitchen staple is acetic acid, making it effective against mineral deposits. Pouring it into the toilet and letting it sit will soften those tough stains.Baking Soda: Known for its deodorizing properties, baking soda can be combined with vinegar to create a bubbly reaction that lifts grime, making it perfect for treating stains.Borax: A magical powder that works wonders when mixed with vinegar or used on its own to scrub away hard water deposits.Step-by-Step Cleaning TechniquesNow, let’s dive into effective methods for cleaning those hard water stains in the toilet:1. The Power of White VinegarStart by removing the majority of the water using a plunger, then dry the bowl with paper towels. Pour in about 2 cups of white vinegar and let it sit for a few hours. Afterward, use a toilet brush to scrub the stains, applying more vinegar if necessary. For exceptionally tough marks, a pumice stone can be a game changer, just ensure the stone is wet to prevent scratching.2. Baking Soda and Vinegar: A Dynamic DuoCombine 1 cup of baking soda with 2 cups of vinegar for a powerful cleaner. Pour the vinegar into the toilet first, followed by the baking soda. You might notice some fizzing! Allow it to sit for at least 10 minutes before scrubbing with a toilet brush.3. Borax Extra BoostFor an enhanced clean, sprinkle ½ cup of Borax into the toilet bowl and let it sit for about 20 minutes. Then scrub away the stains with a brush, followed by a flush to rinse everything away.Additional Insights on Hard Water IssuesMany homeowners may not realize that hard water issues extend beyond just unsightly stains; they can also lead to plumbing problems. Mineral build-up can cause clogs and diminished flow rates in your water system. These cleaning methods not only improve the appearance of your toilet but also contribute to the longevity of your plumbing fixtures.Taking Preventative Measures Against Hard WaterTo prevent the build-up of hard water stains in the future, consider these tips:Water Softener Installation: If hard water is a consistent problem, it may be worth investing in a water softener system to reduce mineral content.Routine Maintenance: Develop a regular cleaning schedule using the eco-friendly methods mentioned above to keep hard water deposits at bay.Engaging Perspectives from the CommunityIt’s fascinating to see how different homeowners tackle the same issue. One reader shared how using Coca-Cola not only cleaned her toilet but also left a fresh scent—an affordable and surprising twist! Others have recommended lavender oil for added fragrance. Exploring these perspectives can provide new and effective ways to approach your cleaning regimen.Your Call to Action: Take Control of Your Bathroom!Don’t let hard water stains rule your bathroom! Try out these cleaning methods today, and you’ll be amazed at the transformation. Remember, keeping your home clean and environmentally friendly is achievable with the right strategies and tools. Share your own experiences and any tips that work best for you in the comments below!

07.15.2025

Revitalize Your Home: Mastering How to Regrout Tile in 8 Simple Steps

Update Transform Your Space: The Value of Regrouting Your Tiles Are your tile floors looking worn and outdated? The state of your grout can significantly impact the appearance of your tiles and the overall feel of your space. Regrouting is an affordable and effective way to breathe new life into tired floors without the hassle of a full renovation. Not only does this DIY project enhance the aesthetics of your home, but it also plays a crucial role in maintaining the integrity of your tiles, ensuring they last longer and remain safe from moisture damage. Gathering Your Essential Tools and Materials Before diving into the regrouting process, it’s crucial to have the right tools on hand. You'll need a grout mix, tile sealant, an oscillating tool, a cloth, tape, a bucket, a trowel, a knife, cleaner, a toothbrush, sponge, a grout float, and a tile finishing tool. Securing these items will streamline the process and help you achieve professional-looking results. A Step-by-Step Guide to Regrouting Let's delve into the eight easy steps that will have your tiles looking brand new in no time. Here’s how to effectively regrout your tiles: 1. Clean the Grout Lines Start by thoroughly cleaning the grout lines to eliminate any dirt or fungus. A bleach solution works well for this task; just ensure it’s safe for your tiles. Apply the bleach and scrub with a toothbrush, rinsing thoroughly afterward. 2. Remove the Old Grout Using an oscillating tool, carefully remove the old grout between the tiles. It's a meticulous job that requires patience—take your time to ensure you do not damage the tiles in the process. 3. Vacuum the Surface Thoroughly After removing the old grout, vacuum the area diligently to clear out any residues. This prepares the surface for the new grout. 4. Prep with Tile Sealant Apply a tile sealant over the exposed surface to create a barrier against moisture and mildew, promoting a healthier home environment. 5. Apply the New Grout With a grout float, spread the new grout into the gap between the tiles evenly. Ensure it fills all spaces without excess on the surface of your tiles. 6. Clean Excess Grout After applying the grout, use a damp sponge to wipe off any excess. This step is critical in ensuring your tiles remain clean and flawless. 7. Let it Cure Allow the grout to set for at least 24 hours. This waiting period is essential for ensuring long-lasting results and preventing future crumbling. 8. Seal the Grout Once the grout is set, apply a grout sealer to protect against stains and moisture. This extra step ensures your efforts last longer and your tiles remain beautiful. Why DIY? The Benefits of Regrouting Many homeowners hesitate to took on home improvement projects, fearing they lack the skills or tools necessary. However, regrouting is a manageable DIY task. Not only does it save money, but it also gives you a gratifying sense of accomplishment. A fresh grout job can dramatically increase the value of your home, making it a smart investment in your property. Common Misconceptions About Regrouting A common misconception is that regrouting is too complicated or requires specialized knowledge. In reality, with careful preparation and following a guided approach, regrouting can be a straightforward task. The transformation is often more dramatic than anticipated, truly changing the ambiance of your living space. Inspiration: Bringing New Life to Your Home As you embark on this regrouting project, think of it not just as maintenance but as an opportunity for rejuvenation. A freshly grouted floor can create a clean, welcoming atmosphere that enhances your home’s charm and comfort. Don't let worn-out grout diminish your home's beauty. With determination and the right tools, you can achieve stunning results that make your floors shine again. Whether you're an experienced DIY-er or a first-timer, regrouting your tiles is a step towards a more vibrant home. Are you ready to dive in?

Terms of Service

Privacy Policy

Core Modal Title

Sorry, no results found

You Might Find These Articles Interesting

T
Please Check Your Email
We Will Be Following Up Shortly
*
*
*