Add Row
Add Element
cropper
update
Ultimate Home DIY
update
Add Element
  • Home
  • Categories
    • Home Hacks
    • Tool Tips
    • Green Living
    • Renovation
    • Fix It
    • Decor Dreams
    • Skill School
April 29.2025
3 Minutes Read

How to Choose the Right Car Jack for Your DIY Projects

Red hydraulic car jack lifting a vehicle: types of car jacks.

Understanding the Different Types of Car Jacks

When it comes to vehicle maintenance, knowing which car jack to use can make all the difference between a smooth tire change and a potentially dangerous mishap. From basic scissor jacks to robust hydraulic floor jacks, there’s a wide variety available, and each supports different needs. Remember, safety should be your utmost priority whenever you’re working on your vehicle.

Why Choosing the Right Jack Matters

Imagine stranded on a roadside, facing a flat tire with nothing but a lightweight scissor jack. While these jacks are convenient, they aren’t always the best option, especially for heavier vehicles. Alan Gelfand, an experienced mechanic, emphasizes the importance of selecting the right tool for your specific situation. Using the wrong jack not only adds frustration but could also lead to serious safety concerns.

The Versatility of the Scissor Jack

The scissor jack, typically included in many vehicles, is designed primarily for emergency situations like changing a flat tire. Its lightweight, compact design makes it easy to transport, but it has its limitations.

Pros: Compact and affordable; easily stored in your trunk.

Cons: Slower operation and limited height range. Importantly, it’s crucial never to rely solely on a scissor jack if you plan to work underneath the car.

Bottle Jacks: A Higher Weight Capacity

For those with heavier vehicles, a bottle jack can be a godsend. Utilizing hydraulic pressure, these jacks can elevate considerable weight, making them suitable for maintenance tasks beyond just tire changes.

Pros: High weight capacity and compact design.

Cons: They require a solid, level base to ensure stability.

As Gelfand advises, keep a piece of plywood in your trunk to provide a sturdy support surface, especially when roadside repairs are needed.

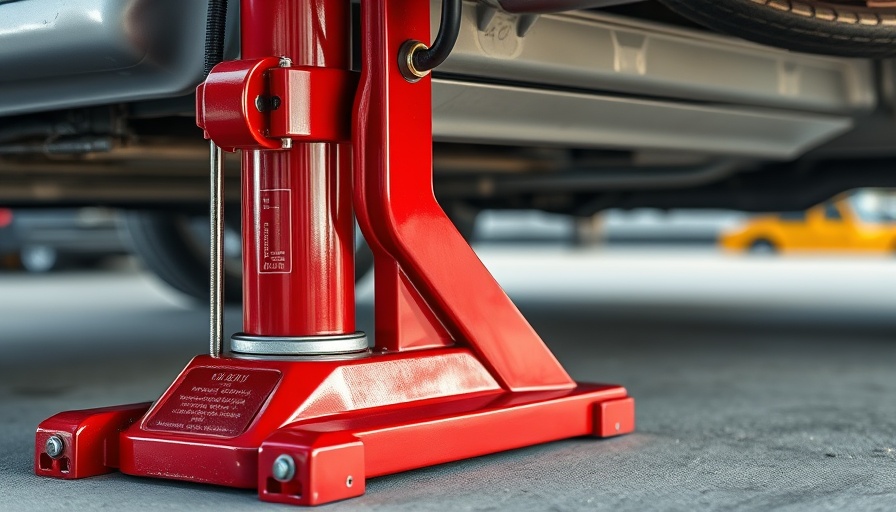
Rolling/Hydraulic Floor Jacks for Serious DIY Enthusiasts

The most ideal option for home mechanics tackling a wider range of repairs would be a rolling or hydraulic floor jack. These jacks combine the benefits of high weight capacity and ease of use. They typically come with adjustable height options, making them perfect for working underneath vehicles.

Pros: Suitable for heavier jobs, offering stability and convenience.

Cons: Pricier compared to basic models, and they require some storage space.

Pro Tips for Safe Car Jack Use

Regardless of the type of jack you choose, safety remains paramount. Here are essential tips to keep in mind:

  • Always use jack stands after lifting your vehicle to ensure it stays stable while you work.
  • Ensure the jack is on a flat, stable surface.
  • Regularly inspect your jack for any signs of wear and tear.

Adapting to the right equipment is just as crucial as having the skills to use them effectively. Mistakes happen—much like the initial experience of that scissor jack buckling—so preventive measures can save lives.

Final Thoughts: Your Mechanic Toolbox Awaits

Choosing the appropriate car jack can empower you as a DIY mechanic while enhancing your safety and efficiency. Assess your specific needs by examining the types of projects you plan to undertake. Whether you're gearing up for simple tire changes or more intricate automotive repairs, investing in the right jack will inevitably lead to smoother processes.

For those passionate about home repair and vehicle maintenance, becoming knowledgeable about car jacks is just the beginning. Empower yourself with safe practices and be proactive in your approach to DIY tasks. Your next project awaits!

Home Hacks

6 Views

0 Comments

Write A Comment

*
*
Related Posts All Posts
10.30.2025

Why a Headboard is Essential for Your Bedroom's Aesthetic and Comfort

Update Why a Headboard Matters More Than You Think When it comes to creating a soothing sanctuary in your bedroom, the furniture you choose plays a pivotal role. Among all the pieces, the headboard often flies under the radar, perceived merely as an optional accessory. However, this perception couldn’t be further from the truth. Headboards do more than just visually complete your bed; they enhance comfort, style, and functionality. Comfort: More Than Just a Visual Element A well-designed headboard serves a vital purpose—it provides back support when you are sitting up in bed, allowing for leisurely reading or working while propped against it. As noted by interior designers, upholstered headboards are especially favored for their plush feel, making them perfect for resting against. They also help to protect your wall from scuffs and scratches, extending the life of your paint or wallpaper. The Aesthetic Appeal of a Headboard Headboards are arguably one of the simplest ways to add a focal point to your bedroom. They define the 'sleeping space' and contribute significantly to the overall aesthetic. Depending on your style, you may opt for a sleek wooden design that adds sophistication or a colorful upholstered headboard that injects vibrancy. Designers emphasize that a bed without a headboard can feel incomplete, almost like an island adrift in a sea of decor. As you consider different design elements, don’t overlook the enormous potential a headboard has to anchor and elevate the room. Exploring Various Styles and Materials Headboards come in an extensive range of styles, sizes, and materials, making it easy to find one that fits your personality and room design. If your bedroom has a minimalist vibe, a low-profile headboard with clean lines is an excellent fit. Conversely, if you desire drama, opt for a tall, tufted headboard or a rustic wooden piece. Some headboards even include built-in storage options, accommodating small spaces efficiently. DIY Options for Headboards on a Budget For those facing budget constraints, there are still ways to achieve the headboard look without overspending. One approach is to transform your wall into a visual anchor by painting an accent shape behind the bed. Alternatively, you might decide to create a DIY headboard using reclaimed materials or simple DIY kits available online, allowing for personalization without the usual steep prices. Why Minimalism Is Not an Excuse to Skip the Headboard With the rise of minimalist interior designs, many shy away from headboards, thinking that a simpler look aligns better with their ideal aesthetic. However, professionals insist that this is a mistake. A headboard can still be integrated into a minimalist style, serving as both a statement piece and a practical anchor without cluttering the space. Designers suggest that even in a minimalist bedroom, headboards can provide warmth and texture, contributing to a welcoming atmosphere. The Future of Bedroom Design: A Balance of Comfort and Style As trends in bedroom decor evolve, the headboard’s role remains multifaceted. It’s not just about style; it’s about creating a restful environment that promotes relaxation and sleep—a crucial aspect in our fast-paced lives. Think of headboards as investments in your well-being, enhancing your bedroom’s functionality while also elevating your personal style. Conclusion: Why You Should Invest in a Headboard As evidenced by the myriad functions a headboard serves, it becomes clear that this piece should not be overlooked. It provides support, ties together your bedroom's decor, and offers an opportunity to express your personal style. Whether you choose to purchase or create your own, investing in a headboard is an essential step toward creating a harmonious and functional bedroom space.

10.29.2025

Clever Hiding Spots for Your Elf on a Shelf to Delight Kids

Update Getting Creative: Unique Hiding Spots for Your Elf on a Shelf The Elf on the Shelf tradition has become a beloved holiday staple in many homes, transforming the countdown to Christmas into a delightful game of hide-and-seek. To keep the excitement alive as this custom approaches its 20-year mark, let’s explore creative hiding spots that will not only surprise your children but also bring joy and laughter into your home. Why Hide the Elf? Though the premise of the Elf on the Shelf involves parental monitoring, focusing on the game aspect can foster family connections. Children love the thrill of finding their elf each morning, making it a fun family activity. By cleverly hiding your elf in unexpected places, you can enhance the charm of this tradition and maintain that magical ambiance during the holidays. Charming Places for Elf Hide-and-Seek Here are some warm and whimsical hiding spots you can use to keep the essence of Elf on the Shelf alive: On the Tree: The Christmas tree is a classic hiding spot. Tuck your elf deep within the branches or even swap the tree topper for your elf one morning! Sitting in a Bookshelf:If your bookshelf is overflowing with books, have your elf perch atop a stack or nestled among favorites, making a cozy reading corner. On Top of the Refrigerator: Utilize that often-overlooked surface and let the elf peek out from behind pantry staples, keeping the search lively for kids. In the Toy Collection: Your elf can join in on the fun by hiding within a pile of stuffed animals, keeping the “friendship” theme going. Cozy by the Couch: Wrap your elf in a warm blanket or tuck it among comfy cushions, perhaps next to a favorite book. Their warmth will make them especially inviting! Fruit Bowl Fun: Why not let your elf join the produce party? Place them among apples, oranges, or other seasonal fruits for a fresh twist. Adding More Joy to the Tradition Incorporating the Elf on the Shelf into other holiday festivities can enhance its value. For instance, instead of solely hiding the elf, why not create little scenarios? Have them “baking” near the kitchen or “decorating” a room with crafts. This can foster creativity among your children as they help bring these scenes to life. Inspiration From Other Ideas Need more ideas? Take cues from other popular lists of hiding spots for the Elf on the Shelf. You can hide the elf in locations like behind the couch, on the windowsill, or in the bathroom, each adding a unique twist and maintaining the element of surprise: In the Bathroom: Surprise your kids by hiding the elf on the bathroom counter next to the soap or even peeking out from a towel. Under the Pillows: Make mornings special by placing your elf beneath the pillows of your children's beds, inviting them to look for their mischievous friend first thing. Near the Christmas Cards: Set up the elf selecting favorite cards to deliver to Santa—how fun for your children to discover this holiday task! Amidst Holiday Baking Supplies: Place them next to cookie cutters or baking sheets as if helping prepare for those seasonal treats. Keeping the Spirit Alive Every family has their unique spin on Elf on the Shelf, and keeping the light-hearted spirit alive is vital. Remember, it’s not just about the hiding but also how these little adventures create memories and bonds that endure beyond the holiday season. Your creativity can spark laughter, stories, and togetherness, all revolving around these little surprises each morning. Take Action: Join the Fun! As the holiday season approaches, it’s time to immerse yourself in the spirit of Elf on the Shelf. Try incorporating these creative hiding spots and share your experiences with friends and family. Start mastering this tradition to create lasting memories that will be cherished year after year. Whether it’s just the two of you or a larger family gathering, the joy of the elf inspires laughter, excitement, and warmth!

10.28.2025

Maximize Your Decor: Essential Tips to Prevent Temporary Hook Damage

Update Introduction: The Allure of Temporary Hooks for Home Decor As the holiday season approaches, homeowners and DIY enthusiasts alike are on the lookout for ways to decorate without leaving a trail of damage behind. Temporary hooks have become hugely popular for this very reason, offering a flexible solution for renters and decorators that seek to add festive flair without the risk of losing their security deposit. However, it’s crucial to know the best practices for using these hooks to avoid unintended wall damage, and with a few tips, they can enhance your space safely and effectively. Types of Temporary Hooks: Understanding Your Options When it comes to temporary hooks, there are primarily three types: adhesive, suction, and magnetic hooks, each with its own applications and limitations. Adhesive strip hooks are among the most commonly used. They work well on smooth, non-porous surfaces such as painted drywall, glass, and tile. For wet areas like bathrooms, specific hooks are designed to resist humidity. Suction hooks create a seal that works best on smooth surfaces like mirrors and tiles, while magnetic hooks, which attach to ferrous surfaces, provide convenience in areas like the kitchen. However, each type poses potential risks to wall integrity if not used correctly. Surface Prep: The Key to Success Before putting any hook on your wall, the first step is to prepare the surface. Ensure it is clean—free from dust and grease—by using rubbing alcohol. This crucial step increases the adhesive power of temporary hooks. Additionally, avoid using adhesive hooks on textured walls or freshly painted surfaces as they are more susceptible to damage. Julian Thomas, a home lifestyle expert, strongly advises testing the adhesive on an inconspicuous area of your wall first and always checking the weight limit specified by the hook's manufacturer. Proper Removal Techniques: Avoiding Damage Removing temporary hooks can often be the most delicate part of the process. Rushing or pulling them off can lead to peeling paint or tearing drywall. Instead, when removing adhesive hooks, gently pull straight down along the wall, stretching the adhesive to release it. For suction hooks, a gentle prying from the edges does the trick without causing marks. For stubborn adhesives, applying heat from a hairdryer for 20 to 30 seconds can soften the adhesive, allowing for easier removal. Incorporating this practice into your process can help maintain the integrity of your walls while still utilizing temporary hook solutions. Alternative Solutions: Going Beyond Hooks If you're seeking more stable solutions without holes, consider tension poles or decorative stands. Tension poles, commonly used to create temporary divisions or support decorations, pose no risk of wall damage while providing excellent stability for hanging items. These flexible solutions work perfectly for arrangements like picture displays or decorative banners, ensuring that the walls remain damage-free. Common Misconceptions about Temporary Hooks Many assume that products marketed as 'no-damage' will not harm any surface, but it's essential to understand that all temporary hooks come with guidelines for use. Ignoring these can lead to the very damages they claim to avoid, risking both your walls and your security deposit. Real-Life Considerations: Rental Implications For renters, every choice carries the weight of financial implications. It’s a known fact that nearly 60% of renters do not expect to receive their full security deposit back, often due to damages. By implementing best practices for temporary hooks, you can enhance your living space while protecting your finances. This season, with a little patience and knowledge on your side, you can decorate your home beautifully without jeopardizing your living conditions. Conclusion: Hang It Right This Holiday Season The perplexities of temporary hooks need not stand in the way of your decorating ambitions. Understanding the types of hooks available, knowing how to prepare surfaces correctly, and following proper removal techniques can mitigate damage. The next time you envision how to infuse your space with holiday cheer, remember that temporary hooks can be your allies if used wisely. Take charge of your holiday decorating! With the right approach, you can transform your home into a festive haven without the added stress. Gather your supplies, follow expert advice, and make this season memorable without leaving a trace on your walls!

Terms of Service

Privacy Policy

Core Modal Title

Sorry, no results found

You Might Find These Articles Interesting

T
Please Check Your Email
We Will Be Following Up Shortly
*
*
*