Add Row
Add Element
cropper
update
Ultimate Home DIY
update
Add Element
  • Home
  • Categories
    • Home Hacks
    • Tool Tips
    • Green Living
    • Renovation
    • Fix It
    • Decor Dreams
    • Skill School
Add Row
Add Element
June 27.2025
3 Minutes Read

Essential Tips for Cleaning Engineered Hardwood Floors Safely

Hand cleaning engineered hardwood floor with cloth

How to Maintain the Beauty of Your Engineered Hardwood Floors

Engineered hardwood floors are a popular choice among homeowners, beautifully blending aesthetics with durability. However, to keep them looking their best, proper cleaning techniques are essential. Fortunately, cleaning engineered hardwood doesn't have to be daunting. This comprehensive guide will walk you through effective cleaning methods, essential tools, and proactive care tips to ensure your floors remain pristine for years to come.

Daily Maintenance: The Key to Longevity

Daily sweeping is crucial for engineered hardwood floors. Sand, dirt, and tiny debris can scratch the surface over time, diminishing its luster. Depending on the foot traffic in your home, adjust your sweeping frequency; for high-traffic areas like the kitchen or living room, a daily sweep is advisable. Use a soft-bristle broom or a lightweight vacuum without a rotating brush, which can be too harsh on the delicate wood surface.

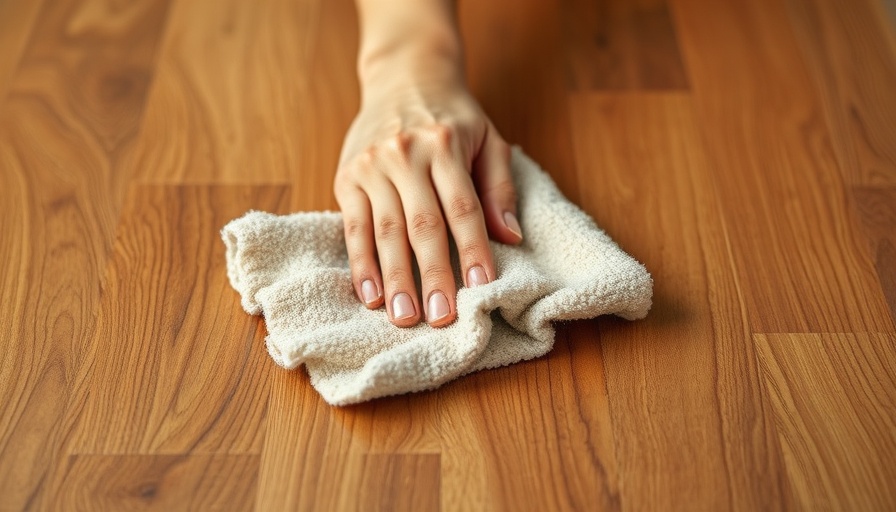
Importance of Mopping: Timing and Techniques

Mopping is another important aspect of maintaining clean engineered hardwood floors. Opt for a damp mop instead of a wet one, as excess water can harm the wood structure. For high-traffic areas, mop once a week; for less frequented spaces, a monthly mopping is sufficient. Keep an eye on the floor’s shine: a dull appearance is a signal that it’s time to mop. Consider using a pH-balanced cleaner specifically designed for wood, as harsh chemicals can damage the finish.

Regular Deep Cleaning: Frequency and Best Practices

Despite regular sweeping and mopping, your floors will benefit from deep cleaning every few months. This involves using a dedicated hardwood floor cleaner to address ingrained dirt and redevelop the wood's protective finish. Ensure you have the right tools, such as a quality microfiber mop and suitable cleaning solution, to avoid damaging the floor. This deep clean can help prolong the life of your engineered hardwood by removing built-up residues that standard cleaning may miss.

Protecting Against Scratches and Damage

Preventive care is vital for any hardwood floor, especially if you have pets or children. Use area rugs in high-traffic spots and place felt pads under furniture legs to reduce scratches. Additionally, addressing any scratches immediately with a wood floor repair kit can help maintain the integrity of the surface. Neglecting these minor damages can lead to more significant issues down the line, so it’s crucial to remain vigilant.

Understanding What to Avoid

When cleaning engineered hardwood, avoid abrasive cleaners, excessive water, and steam mops. These can strip the finish or cause warping. Instead, stick to soft cloths and products tailored for wood care. Your choice of materials can significantly impact the longevity and appearance of your floors, so always opt for gentle and safe methods.

Why Regular Cleaning Matters

Maintaining a clean space transcends merely aesthetic value; it impacts the health of your environment. Dust and allergens can accumulate in neglected areas, potentially affecting air quality. Moreover, clean floors contribute to a serene and welcoming home atmosphere, making it easier for you and your loved ones to relax and enjoy your space. Emphasizing regular cleaning routines not only enhances the beauty of your engineered hardwood floors but also fosters a healthier living environment.

In conclusion, keeping your engineered hardwood floors clean is not only about maintaining their beauty but also about ensuring their longevity and protecting your investment. By adopting a consistent cleaning regimen and using the right tools and techniques, you can enjoy the warmth and elegance of your floors for years to come. Start today by integrating these practices into your routine and see the positive changes for yourself!

Call to Action: If you found these cleaning tips helpful, why not share them with a friend or family member who also wants to keep their floors stunning? Your insights can help them make informed choices about their flooring care!

Skill School

2 Views

0 Comments

Write A Comment

*
*
Related Posts All Posts
06.29.2025

Confused About Bathroom Drywall? Discover the Best Options for Your Home

Update Choosing the Right Bathroom Drywall: A Comprehensive Guide Are you standing at the crossroads of bathroom renovation, trying to decide what type of drywall is best for your space? With countless options available, selecting the right one can feel overwhelming. However, understanding the attributes of each type can make your decision much simpler. Understanding the Importance of Moisture Resistance Bathrooms are notorious for humidity and dampness, making moisture resistance a vital factor in choosing drywall. Some drywall types can withstand moisture effectively, ensuring longevity and preventing unpleasant mold growth. For homeowners embarking on DIY renovations, recognizing which products are suitable for high-moisture settings is crucial for sustainable home improvements. The Top Types of Bathroom Drywall Here, we’ll explore some of the leading drywall types suited for bathrooms: 1. White Board Drywall: As one of the most popular choices, white board drywall is commonly used in various areas of the home, especially bathrooms. Its moisture-resistant quality makes it a reliable option. 2. Blue Board Drywall: Known for its plaster backing, blue board offers enhanced water resistance. Given its versatility, it’s suitable for bathrooms as well as other areas in your home. 3. Green Board Drywall: While moisture-resistant, green board is not entirely waterproof. It can manage humidity well but should be used cautiously in bathrooms. 4. Purple Board Drywall: If you’re willing to invest a bit more, purple board provides superior moisture and mold resistance. Its waterproof properties make it an excellent choice for high-humidity areas. 5. Paperless Drywall: This option is increasingly favored due to its lack of paper, making it resistant to mold. Though often pricier, it’s a worthy investment for long-lasting durability. 6. Type X Drywall: Beyond moisture resistance, type X drywall also offers fire-resistant qualities. Its unique construction makes it a robust option for safety-conscious homeowners. Insulation: A Key Step in Your Drywall Installation Before diving into the actual installation of your chosen drywall, proper insulation is essential, especially if the bathroom is situated on an exterior wall. Opt for thicker insulation for cooler climates, while standard insulation is adequate in warmer regions. Don't overlook safety: wear a mask during the insulation process to safeguard against dust and irritants. The Installation Process: Steps to Follow for Success Once insulation is complete, installing drywall can begin: Measure and cut the drywall according to your space. Secure the drywall to wall studs with screws or nails, ensuring stability. Seal the seams using tape and joint compound, smoothing it out for a flawless finish. After drying, sand the area gently for an even surface. Engaging in these steps can help you achieve a professional-looking bathroom remodel without the high costs associated with hiring contractors. The Benefits of Choosing the Right Drywall Understanding the different types of drywall and their respective advantages is not just about aesthetics; it also greatly affects the longevity and safety of your bathroom. Mold-resistant materials contribute to a healthier living environment, and investing in quality drywall can prevent costly repairs down the line. As a homeowner, it’s empowering to know that the choices you make in drywall selection can lead to a functional and beautiful bathroom. Inspiration for Your Next Bathroom Renovation As you prepare to embark on your bathroom improvement project, consider how the right materials will impact not just the look of your home but the overall quality of life it provides. Remember, renovations offer you the chance to create a space that reflects your personality while providing comfort and utility. In conclusion, choosing the right type of drywall can significantly enhance your bathroom’s durability and aesthetic appeal. Be thoughtful in your selection, and don’t hesitate to invest in the right materials for your home. For more advice on home improvement, join our community for tips that help you create spaces you love.

03.26.2025

How to Clean and Shine Engineered Hardwood Floors for Lasting Beauty

Update Unveiling the Charm of Engineered Hardwood Floors Engineered hardwood floors have gained immense popularity among homeowners due to their durability and aesthetic appeal, outclassing traditional hardwood in many aspects. However, while they enhance the beauty of our homes, these floors also require a thoughtful approach to cleaning and maintenance to preserve their charm. Essential Tools for a Gleaming Finish Before diving into the cleaning process, having the right tools on hand is essential. Here’s what you’ll need: A vacuum cleaner or sweeper Warm water Vinegar A specially formulated floor cleaner Sanding equipment for minor repairs With your toolbox filled, let’s explore how to clean and shine engineered hardwood floors effectively. Step-by-Step Guide to Cleaning Your Floors Taking care of your engineered hardwood floors doesn’t have to be a backbreaking task. Implementing a regular cleaning routine will keep your floor shiny and inviting. Here’s how: 1. Ideal Vacuuming Practices A quality vacuum cleaner is your best ally in picking up dust and dirt. It’s crucial to choose a vacuum designed specifically for hardwood surfaces, as traditional beater bar vacuums can scratch the finish. Avoid steam mops, as the high humidity can damage engineered wood. Instead, aim to vacuum regularly to prevent dust from settling into your floors. 2. Create a Natural Cleaning Solution Nothing beats a good DIY cleaning solution! Combine equal parts of warm water and vinegar in a spray bottle and spritz the mixture directly onto your floor. Use a mop to spread it across the surface, ensuring not to saturate the wood. This inexpensive solution neutralizes odors and shines floors naturally without harmful chemicals. 3. Choose the Right Commercial Cleaner If you prefer store-bought solutions, it’s vital to select cleaners specially formulated for engineered hardwood floors. Stay away from harsh products that could harm the flooring's finish. Always perform a patch test in a discreet area before applying any new product widely, ensuring it won’t cause discoloration or damage. 4. Protect High-Traffic Areas To keep your floors looking their best, consider placing area rugs at entry points and high-traffic spaces. A well-chosen rug not only adds style but also acts as a barrier, preventing dirt and scratches. Look for options that complement your decor; they can beautifully enhance your home while providing protection. 5. Resand and Refinish When Necessary Even with diligent cleaning, wear and tear can occur. If furniture has scratched the surface, sanding and refinishing are effective solutions. Regularly check for damage and schedule a refinishing routine every few years to keep your floors looking as good as new. The Emotional Value of Well-Maintained Floors A clean and shiny floor instills a sense of pride and accomplishment in any homeowner. Whether you're hosting friends or enjoying a quiet evening at home, your engineered hardwood floors set the stage for those moments. Maintaining their shine enhances both the aesthetic and emotional value of your space. Current Trends in Floor Care As homeowners become increasingly invested in sustainable living, choosing eco-friendly cleaning products has become a trend. Many floor care companies now offer biodegradable cleaner options that are safe for both your flooring and the environment. Investing in these products aligns with a healthier planet and more sustainable home. Conclusion: Shine On! Maintaining the beauty and shine of your engineered hardwood floors is within your reach. By following these simple yet effective cleaning tips, you can create a welcoming atmosphere in your home for years to come. Make it a habit to clean regularly and take your time with the special treatments to enjoy the vibrant elegance of your floors. Feeling inspired? Start your cleaning journey today by gathering your tools and trying out these tips to refresh your living space. The beauty of your home is only a clean floor away!

03.25.2025

Discover How to Remove Window Screens Like a Pro: A Step-by-Step Guide

Update Mastering the Art of Removing Window Screens: A Complete GuideIf you're a homeowner looking for a straightforward yet informative guide to removing window screens, you've come to the right place! Whether for repairs, replacements, or just a seasonal cleaning, knowing how to effectively take down your window screens can make a world of difference in maintaining your living space. This guide will empower you with the necessary skills and understanding to handle this task safely and efficiently.Understanding Your Window Screen TypesBefore diving into techniques, it's essential to familiarize yourself with the different types of window screens. Screens come in various designs and installation methods, which can influence how you remove them. Here’s a brief overview:Interior Window Screens: Normally installed from the inside, these screens offer aesthetic benefits and can be easily accessed during maintenance.Exterior Window Screens: These are fitted outside and may require special techniques due to their installation method.Essential Tools for the JobPreparation is key! Ensure you have the following tools handy:Screwdriver: Useful for removing any screws that may secure the screen frame.Utility Knife: If you need to cut away any existing spline or sealants.Gentle Pry Tool: Helpful for dislodging screens without damaging the frame.Step-by-Step Guide on Screen RemovalNow, let’s begin the step-by-step process of removing your window screens:Open the Window: Start by fully opening your window to allow access to the screen.Locate Remove Tabs/Dowels: Search for any tabs or dowels securing the screen to the frame. These are often found on the sides of the screen. Pull them out gently.Pull Out the Screen: Lift the screen slightly and angle it to remove it from the frame. If your screens use pins, remember to take those out carefully.Store Carefully: Lay your screen down flat in a safe area to prevent damage during repairs or replacements.Addressing Common Issues in Screen RemovalEvery DIY enthusiast knows that surprises often arise. Here are some common issues you might face:Stuck Screens: If a screen doesn’t budge, there might be debris or rust. Gently pry it out with your tool.Bent Frames: Inspect the frame carefully and use a level to fix it before attempting to re-install the screen.Cleaning and Maintenance TipsWhile you have your screens out, this is the perfect time to give them a cleaning. Use a soft brush and warm, soapy water to wash away dirt. Storing your screens in a dry, flat location ensures they remain in great shape until you are ready to reinstall them.Future Predictions and Seasonal ConsiderationsMoving forward, taking care of your window screens can enhance your home's ventilation and protect against insects. In an era of climate change awareness, also consider using energy-efficient screens that maximize airflow while minimizing dirt entry.Final Thoughts: Take Charge of Your Home Improvement ProjectsUnderstanding how to handle window screens is valuable knowledge for homeowners. This skill can save you time, money, and unnecessary stress. If you follow this guide and take proactive steps to maintain your window screens, your home will not only look beautiful but will also function optimally. Don’t hesitate; grab your tools and get started on this rewarding DIY journey! Want to dive deeper into home improvement? Check our other articles that cover repairs and renovations to turn your home into your dream space!

Add Row
Add Element
cropper
update
Ultimate Home DIY
cropper
update

We provide the most up to date renovation and repair information for homeowners and DIY enthuastists.

  • update
  • update
  • update
  • update
  • update
  • update
  • update
Add Element

COMPANY

  • Privacy Policy
  • Terms of Use
  • Advertise
  • Contact Us
  • Menu 5
  • Menu 6
Add Element

+16479511958

AVAILABLE FROM 8AM - 5PM

City, State

, ,

Add Element

ABOUT US


Add Element

© 2025 CompanyName All Rights Reserved. Address . Contact Us . Terms of Service . Privacy Policy

Terms of Service

Privacy Policy

Core Modal Title

Sorry, no results found

You Might Find These Articles Interesting

T
Please Check Your Email
We Will Be Following Up Shortly
*
*
*