Add Row
Add Element
cropper
update
Ultimate Home DIY
update
Add Element
  • Home
  • Categories
    • Home Hacks
    • Tool Tips
    • Green Living
    • Renovation
    • Fix It
    • Decor Dreams
    • Skill School
July 06.2025
3 Minutes Read

Build Your Own DIY Dog Wash Station: Easy Steps to Follow

DIY dog wash station with a large dog outdoors.

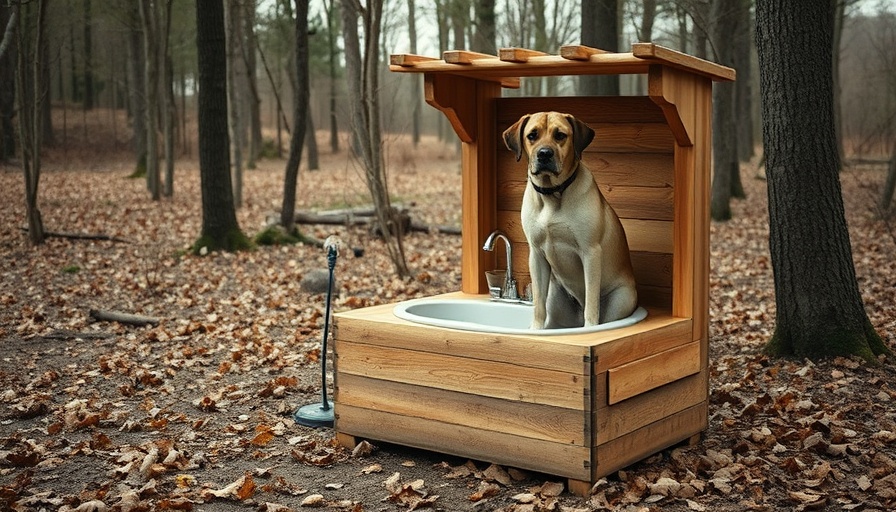
Transform Your Home with a DIY Dog Wash Station

If you're a dog owner, you know how quickly your furry friend can turn from clean to messy, especially after an adventurous day outside. Creating a DIY dog wash station at home is not only practical but also a rewarding project that enhances your living space. Imagine the ease of rinsing off muddy paws and giving your pet a refreshing bath right in your backyard or utility room. Here’s a comprehensive guide to building your own dog wash station, along with tips and ideas to make the process enjoyable!

Why Build a Dog Wash Station?

Bathing your dog regularly is crucial for their hygiene and health. A designated wash station keeps the mess contained and makes bath time a breeze. With debris and dirt being an inevitable part of a dog's life, having a dedicated space saves you time and helps maintain the cleanliness of your home.

Gather Your Supplies for Success

Before beginning your project, ensure you have all the necessary tools and materials. Here’s a quick checklist:

  • Acrylic or fiberglass shower pan (60” x 36”)
  • Wood pieces (2” x 4”)
  • Plywood sheet (1 ¾ inch, 4” x 8”)
  • Tiles, grout, and thinset mortar
  • Shower drain assembly and P-trap
  • Handheld shower head assembly and other basic tools (saws, drill, screws, etc.)

Step-by-Step Guide to Building Your Dog Wash Station

1. Cut the Wood

Start by cutting your 2” x 4” wood into 16 equal pieces for constructing the frame, along with a plywood piece measuring 60 inches by 36 inches to serve as the top.

2. Build the Walls

Create the back and side walls using the 36-inch and 60-inch wooden pieces. Ensure each wall is sturdy, maintaining your dog’s safety during bath time.

3. Assemble the Structure

After constructing the walls, connect them with structural rings, securing each section with nails. This gives your wash station the necessary support and durability.

4. Install the Shower Pan

Position the acrylic shower pan on top of the frame. Use a construction adhesive to secure it, allowing it to dry thoroughly before moving on.

5. Finishing Touches with Cement Board and Tiles

Add cement board to the sides and back walls before tiling. When applying your tiles, make sure to use a notched trowel for even adhesive distribution. This creates an easy-to-clean surface and a stylish appearance.

6. Drain Installation

Finally, install the drain assembly properly, cutting necessary holes into both the plywood and shower pan for effective water drainage.

Enhancing Your Dog Wash Station Experience

Beyond the basic setup, you can personalize your dog wash area. Adding hooks for towels, storage for grooming supplies, or even a small bench can make the experience more comfortable for both you and your pet. Consider providing a non-slip mat to ensure your pup's safety while bathing.

Embrace the Clean, Keep Your Home Happy

A DIY dog wash station not only simplifies the bath process but also fosters a closer bond between you and your pet. It’s a testament to your love and care, turning an ordinary chore into a delightful experience. Moreover, it keeps your home free from the mess that comes with dog ownership!

Conclusion and Next Steps

Creating a dog wash station is a fulfilling project that pays off in convenience and cleanliness. Now that you have the tools, tips, and a step-by-step guide, it’s time to roll up your sleeves and get started. Embrace the joy of caring for your furry companion while keeping your living space neat.

For more DIY home improvement tips and to learn about sustainable living practices that integrate easily into your lifestyle, check out our resources!

Skill School

48 Views

0 Comments

Write A Comment

*
*
Related Posts All Posts
01.09.2026

DIY Guide: How to Build a Shower Base for Your Walk-in Shower?

Update Transforming Your Bathroom: Building a Walk-in Shower Base Are you dreaming about a stylish and spacious walk-in shower? With the right planning and tools, this DIY project can become a rewarding addition to your home. Walk-in showers are not just about aesthetics; they offer a practical solution to modern living by providing ease of access while enhancing your bathroom’s appeal. Essential Tools and Materials Before you begin the journey of constructing your shower base, gathering all necessary tools and materials is crucial. Here’s what you’ll need: Shower tray (preferably sloping) Shower drain Optional curb Waterproof materials Thin-set mortar Sealant Adhesives Shower kit (including a shower head, faucet, and arm) Circular saw, drill, and other DIY tools for cutting and assembling Measuring tape and level for precise measurements Choosing the right shower kit is a key step in this process. Kits vary significantly; renowned options like KBRS and Fundo Lingo offer diverse accessories and compatibility with various shower designs. Step-by-Step Guide to Installation Building a shower base for your walk-in shower can be accomplished with some diligence. Follow these essential steps: 1. Assess the Shower Floor Start by examining your shower floor. It needs to be flat and devoid of any bumps. If inconsistencies are present, consider leveling them out before you proceed. 2. Create the Shower Base Cut your shower tray to the desired size, ensuring it fits snugly in your space. Applying an even layer of thin-set mortar to the subfloor is necessary; this helps bond the shower tray to the floor securely. Don’t forget to clean the subfloor before applying the thin set to avoid any debris disrupting the bond. 3. Finalize the Drain Installation Apply sealant around the drain and let it dry. Insert the drain through its hole and ensure a watertight finish by properly sealing all connections. A strong waterproofing layer is essential to prevent any leakage. 4. Add the Curb and Waterproofing After you’ve set the tray, consider installing curbs to enhance safety by reducing slip risks. Lastly, apply liquid waterproofing to all surfaces to complete the waterproof barrier. Make sure to follow the manufacturer’s instructions for the best results. Common Myths Debunked Many people may believe that constructing a walk-in shower base is a complex task that requires professional help. However, with the right guidance, tools, and a bit of patience, any homeowner can achieve this upgrade. Key factors include: Understanding the layout and design considerations for effective waterproofing. Recognizing that DIY projects don’t have to be overwhelming—take it step-by-step! Future Considerations As you undertake this project, think about long-term upkeep and maintenance. Materials that are durable and easy to clean can extend the lifespan and look of your shower. Choosing well-designed fixtures will not only improve functionality but also enhance the aesthetic appeal of your bathroom. Embracing the Spirit of DIY Building a shower base for your walk-in shower is not just a task; it’s a chance to personalize your living space. With a little investment in your time and resources, you can achieve a project that reflects your style and meets your functional needs. Consider gathering a couple of friends to share the experience! Transforming your bathroom can be a memorable event to bond over. Take the first step towards your shower renovation! Gather your materials and start planning your project today. If you want even more tips and details, feel free to explore our comprehensive guides on home improvement and decorating.

11.23.2025

6 Smart Strategies for Buyers: Consider Before Purchasing a Shed Kit

Update Understanding Your Shed's PurposeBefore diving into purchasing a shed kit, it's essential to clarify what you plan to use it for. Will it serve as a storage space for tools, a workshop for hobbies, or even a retreat for relaxation? Defining the shed's purpose helps tailor its design features — such as ventilation, shelving, and electricity accessibility — thus avoiding future inconveniences.Budgeting for Your ShedYour budget plays a crucial role in selecting the right shed kit. Shed prices vary significantly based on size, materials, and additional features. While a lower-priced kit might seem appealing, hidden costs for essential components (like flooring) can add up later. Consider investing a little extra upfront to ensure durability and functionality.Choosing the Right Size: Less is More?When it comes to size, bigger isn't always better. Consider the space you have available, local regulations, and your actual storage needs. A well-planned smaller shed can often serve the same purpose effectively, leaving you with more yard space for other activities or landscaping.The Importance of Building PermitsMany homeowners overlook the necessary permits required for constructing a shed. Even small backyard structures often require approval, especially if they exceed specific dimensions or are close to property lines. Failing to check zoning requirements can lead to fines or even removal orders, making it essential to consult local regulations before starting.Assistance with Assembly: DIY or Professional Help?Not all shed kits come with easy assembly instructions. If you're unfamiliar with power tools or construction basics, consider hiring a professional for installation. Those with DIY skills can save money by assembling kits themselves, but ensuring that the process is manageable is key.Exploring Materials: Durability Versus CostThe materials used in your shed can significantly affect its performance and longevity. While wooden sheds may offer aesthetic appeal, metal or plastic options can provide better resistance against weather and pests. Understanding the pros and cons of available materials ensures you choose wisely based on your specific climate and maintenance preferences.Future-Proofing: Planning for ExpansionIn the excitement of choosing the perfect shed, many overlook future needs. As your circumstances change, so might your storage requirements. It's wise to select a size and layout allowing for easy add-ons or expansion in the future, thus minimizing overall costs.Put thought into each of these components before making your purchasing decision. Ultimately, a shed can be a valuable addition to your property, but only if chosen wisely. By considering your purpose, budget, size requirements, necessary permits, assembly options, and material durability, you can make a well-informed decision that serves you for years to come.

11.19.2025

Is Your Driveway Showing Signs of Wear? Learn When to Replace It

Update The Lifespan of Your Driveway: Understanding the Signs A driveway is more than just a functional space; it plays a crucial role in enhancing your home's curb appeal and maintaining property value. In Michigan, harsh weather conditions, combined with wear from heavy vehicles, can significantly impact your driveway's condition over time. Key indicators exist to help homeowners discern whether repairs are sufficient or if a complete replacement is necessary. Spotting Cracks: When Small Problems Become Big Ones Small hairline cracks can be a normal part of concrete curing; however, persistent or widening cracks often signal deeper structural issues. These issues arise from soil movement, freeze-thaw cycles, or improper drainage pathways. Homeowners should be alert for cracks that keep reappearing even after repairs. An experienced concrete contractor can make a thorough assessment, determining whether resurfacing can resolve the issue or if replacement is the safer option. Drainage Issues: Why Puddles Matter Observing persistent puddles on your driveway after rainfall is not just an aesthetic concern; it could lead to significant problems, including foundation damage and soil erosion. A well-installed driveway should slope away from your home to redirect water. If pooling occurs frequently, it may indicate that your driveway has settled unevenly over time. In this case, consulting a professional can provide options for re-grading or repair, which also helps enhance the longevity of your driveway. Dealing with Spalling: What You Should Know Winter in Michigan is notoriously tough on concrete driveways. If you notice flaking, peeling, or spalling of the surface, repairs might only be a temporary fix if the damage has penetrated beneath the surface. This condition arises due to exposure to de-icing salts and rapid temperature fluctuations. Switching to air-entrained, high-strength concrete during a replacement can significantly mitigate future weather-related issues while extending the lifespan of your driveway. The Importance of Addressing Uneven Sections Driveways that sink or present uneven surfaces pose safety hazards, creating tripping risks. While localized leveling (mudjacking) might work for small patches, widespread sinking often indicates base failure, suggesting a complete replacement to secure safety and durability in the long run. Proper inspection for these underlying issues by a knowledgeable contractor is essential for maintaining your driveway's integrity. Enhancing Curb Appeal: When to Consider a Replacement Even if your driveway remains structurally sound, signs of fading, staining, or cracking can detract from your home's appeal. Opting for a modern design, such as stamped or colored concrete, can boost your property’s value. Aesthetic improvements not only update your home’s look but also provide a fresh foundation for enjoyable gatherings and family activities. Conclusion: Taking Action on Your Driveway’s Condition Replacing or repairing your driveway can be an overwhelming task, but recognizing the signs early can save you money in the long run. It’s vital to consult with qualified contractors in Michigan who understand the unique challenges posed by the state’s weather. These professionals can assess the extent of damage and recommend the best steps forward for your driveway. Don’t wait for problems to become severe—schedule an inspection today to ensure your driveway remains functional and attractive.

Terms of Service

Privacy Policy

Core Modal Title

Sorry, no results found

You Might Find These Articles Interesting

T
Please Check Your Email
We Will Be Following Up Shortly
*
*
*